Have you heard about Internet Protocol TV (IPTV)? It’s a popular way to stream live TV and video-on-demand content directly over the internet. As more people cut the cord with cable TV, IPTV offers an affordable option to access their favorite shows and channels.
But getting an IPTV service set up can seem daunting if you’re not tech-savvy. Thankfully, the VLC media player makes streaming IPTV subscriptions an absolute breeze. Originally created in 2001 for playing any video format, VLC has grown into the perfect solution for watching IPTV.
In this post, I’ll provide a step-by-step guide to configuring VLC to stream an IPTV subscription. Whether you want to watch the latest sports games or catch up on missed episodes, let’s get you set up!
Understanding IPTV and How It Works
So what exactly is IPTV? Put simply, Internet Protocol TV delivers television programming over the Internet instead of through traditional cable or satellite.
With IPTV, channels come through as video streams encoded using IP technology. All you need is an internet connection and an IPTV subscription service. Many providers also offer video-on-demand libraries along with their channel packages.
When you sign up for an IPTV service, you gain access to an M3U playlist file. This file type contains the links to all the individual video and audio streams that make up the TV channels and content offered by your provider.
That M3U playlist gets imported into a media player app on your device, like VLC. The player then uses those links to grab the video streams and play your IPTV subscription!
Why Use VLC for Streaming IPTV?
VLC media player is the perfect choice for IPTV because it effortlessly handles those M3U playlist files. Developed as an open-source, cross-platform project, VLC plays just about any video or audio format you can think of.
Unlike some media players, VLC is entirely free to use. It also doesn’t contain any ads or malware. Streaming IPTV through VLC means you get a clean interface and smooth performance without frustrating interruptions.
Some other great features that make VLC ideal for IPTV include:
- Organize streaming channels into personal playlists
- Chromecast support to watch IPTV directly on your TV
- Record live streams for later viewing
- Slow down or increase playback speed
- Add subtitles and sync audio
Ready to enjoy all this functionality for your streaming? Let’s set it up!
Step-By-Step Guide to Setup IPTV Streaming in VLC
Getting IPTV ready to watch through VLC only takes a few minutes. Follow this simple process:
Install VLC Media Player
First, head to the official VLC website and download the latest installer for your operating system. Windows and Mac both have great support.
Run through the installation process and make sure to customize any options to suit your preferences.
Get Your IPTV Playlist
You’ll need access to an M3U or M3U8 playlist file from your IPTV provider. This file type contains all the links to the individual video streams for the available channels and content.
Your IPTV provider may include login details to directly access this playlist file. Alternatively, they may have an app that handles the streaming instead.
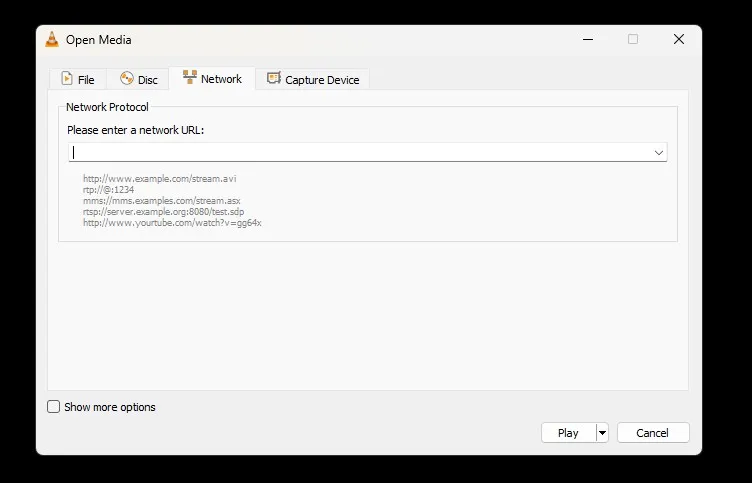
Open Network Stream in VLC
With VLC launched on your computer, click Media > Open Network Stream. A dialog box will open up.
Paste the link to your M3U playlist in the input field.
Import and Play the IPTV Playlist
After pasting or selecting your playlist file/link into the input box, click the Play button. VLC will take a moment to import all the streams.
Once processed, your IPTV subscription channels and media should start playing smoothly! You can browse through all the available content using the sidebar.
Tips for the Best Streaming Experience
VLC makes streaming IPTV a breeze with just a few steps. But let’s go over some tweaks to enhance performance and customization:
- Adjust network caching settings to reduce buffering
- Lower MTU value if having trouble with specific streams
- Optimize hardware decoding support for your device
- Change subtitle size, color, and syncing
- Set up scheduling to record IPTV streams automatically
Conclusion
I hope this guide gave you a helpful overview of exactly how to configure the incredible VLC media player for streaming an IPTV service. VLC makes it so fast and convenient to access all your favorite entertainment thanks to its handling of M3U playlists.
So give it a try! Import your IPTV playlist URL, organize your channels, and start streaming your subscription today. Feel free to ask any questions in the comments too!